How To Take Racing Photos
A complete spectator's guide to racing photography: where to stand, which settings to start with, how to pan, how to shoot through fences and how to come home with keepers.

Good racing photos come from three things: standing in the right place, using settings that match the speed of the cars at that spot, and staying long enough to learn the rhythm of a corner. Expensive gear helps at the margins, but a mid-range body with a 70-300mm lens in a good position will beat a flagship camera in a bad one.
This guide is written for spectators: people with a general admission ticket or a paddock pass at an IMSA round, a NASCAR weekend, a Formula 1 race in Miami, Austin or Las Vegas, or a local SCCA event. If you have media credentials, most of it still applies, just from closer up.
Before the race: plan like a photographer
Read the venue’s camera policy first
Camera rules vary a lot between circuits, and they change. As an example, Circuit of the Americas’ posted policy for motorsport events (updated August 2025) allows personal cameras and detachable lenses but bans tripods, bipods, monopods and “detachable telephoto lenses”, and all gear has to fit the 12 x 12 x 20-inch bag limit. Other venues allow long lenses but ban monopods in the grandstands. Read the venue’s own camera policy or prohibited-items list for your event, and if the wording is unclear, contact the venue before you pack a lens you can’t afford to leave in the car.
Study the track map and the schedule
Download the circuit map and the weekend schedule. Mark the corners where cars brake hard (hairpins, the end of long straights), the spots with elevation change, and the places where spectator areas sit close to the track. Then match those to sessions: practice and support races are where you learn a corner, and the main race is where you use what you learned.
- Slow corners (hairpins, chicanes) give you time, braking drama, glowing brake discs at night and the easiest panning.
- Fast sweepers give you cars on the edge of grip, but they need faster shutter speeds and more practice.
- Elevation (crests, compressions, banking) adds shape to the car and the background.
- The pit straight and pit lane give you pit stops and crowd shots, but fences and grandstands make them crowded.
Check the sun
Work out where the sun will be during the sessions you care about. Front-lit cars on a clear day look clean but flat; side light and low evening sun show off bodywork. Backlit corners can work for silhouettes and dust, but they are hard to expose. A sun-position app and the circuit map are enough to plan which side of the track to walk to and when.
Gear that works from the spectator side
You don’t need a bag full of lenses. For most circuits, a telephoto zoom does 80 percent of the work.
- Telephoto zoom (70-300mm, 100-400mm or similar): the core lens for on-track action from behind fences. On an APS-C body, a 70-300mm frames like roughly 105-450mm on full frame.
- Standard zoom (24-70mm or 18-55mm): for the paddock, the grid walk if you have access, fans and the atmosphere.
- Fast prime (35mm or 50mm f/1.8): cheap, light and useful after dark in the paddock.
- Spare batteries and cards: continuous shooting fills cards quickly, and long days drain batteries.
- Ear protection: a full day trackside is loud enough to matter. Foam plugs weigh nothing.
- Rain cover and a microfiber cloth: races don’t stop for drizzle.
If you’re choosing between bodies, autofocus tracking and burst rate matter more than megapixels. For a deeper breakdown of focal lengths, see our guide to the best lenses for car photography.
Starting camera settings
Use these as starting points, then adjust after checking a few frames at 100 percent on the rear screen.
- Freezing action: shutter priority (Tv/S) at 1/1000 to 1/2000 sec, auto ISO with a sensible cap, continuous autofocus (AF-C/AI Servo) and burst mode.
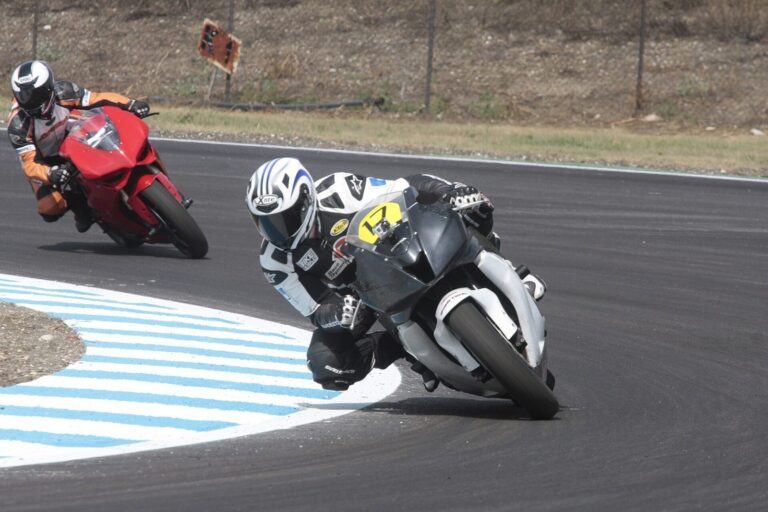
- Panning: shutter priority at 1/250 sec to start, then 1/160 and 1/125 once you’re hitting a good share of sharp frames. Experienced shooters go to 1/60 or slower at slow corners.
- Aperture: when the shutter is slow, the camera will close the aperture in bright sun. f/8 to f/16 is normal for daytime panning; an ND filter lets you keep it wider.
- Focus area: a zone or expanded-point mode placed over the front of the car. Many recent bodies have vehicle or motorsport subject detection; turn it on and test it in practice sessions.
- Stabilization: use the panning mode if your lens or body has one. Canon, for example, describes its IS Mode 2 as correcting shake only perpendicular to the direction of the pan.
Our camera settings for motorsport cheat sheet goes through each mode and when to break the rules.
How to pan
Panning is the technique that separates racing photos from snapshots. The car stays sharp, and the background and wheels blur, so the image looks fast even though it’s a still.
- Stand square to the point where you want to take the shot, feet shoulder-width apart, then twist your upper body toward where the car will come from.
- Pick up the car early and track it smoothly with your whole upper body, not just your arms.
- Half-press to focus (or use back-button focus) and keep tracking.
- Fire a short burst as the car passes the spot you chose.
- Follow through. Keep panning after the last frame, like a golf swing. Stopping as you press the shutter is the most common cause of blur.
Expect a low hit rate at first. At 1/60 sec, even experienced photographers keep only a fraction of their frames, which is why you start faster and work down. Chasing the slowest shutter speed isn’t the point; the right speed is the one where the car is sharp and the background shows motion. For more panning drills, read Capture the Action! Tips and Tricks for Photographing Fast Moving Subjects.
Shooting through catch fences
At most US tracks, spectators shoot through catch fencing. That’s fine if you understand the physics: the closer the fence is to your lens, and the wider your aperture, the more the wire disappears into blur.
- Put the front of the lens hood close to or against the fence, centered in one of the gaps. Don’t push the lens through the mesh.
- Use a wider aperture (f/4 to f/5.6) and a longer focal length. Shooting at f/16 will bring the wire back into view.
- Avoid shooting at an angle through the mesh; the diagonal increases how much wire is in the frame.
- If the venue provides photo holes or gaps in the fencing at some corners, use them briefly and share them with other spectators.
- Switch to single-point or zone autofocus if the camera keeps locking onto the fence.
Composition beyond the side-on pan
A full card of identical side-on pans is a common first-race result. Mix it up:
- Head-on and three-quarter shots under braking with a long lens compress the scene and show the car loaded on its front tires.
- Tight crops on the driver’s helmet, the wheel over a curb or a brake disc glowing at night.
- Wide context shots: the car small in the frame against the grandstand, banking, trees or a skyline.
- Battles: two or three cars nose to tail into a braking zone tell more of a story than one car alone.
- The paddock and pit lane: mechanics, tire warmers, crews pushing cars, fans and drivers signing autographs.
Leave room in front of the car in the direction it’s traveling. A car pointing out of the frame edge feels cramped.
Working with the light and the weather
Midday sun gives hard shadows under the cars and harsh reflections. Use that time for panning at slow corners, where blur hides some of the harshness, or for the paddock. Evening light, especially at endurance races that run into the dark, is where the most atmospheric images happen: headlights, brake glow, pit-lane lights and the sky.
Rain is an opportunity. Spray, reflections and wet track surfaces add drama. Protect your camera, use a faster shutter speed to freeze spray, or a slower one for streaks. Keep a lens cloth handy for the front element.
Night and endurance racing
Endurance races such as the Rolex 24 at Daytona and the 12 Hours of Sebring run into or through the night, which gives US spectators rare chances to shoot motorsport after dark. Raise ISO to 3200-6400 or higher, use your widest aperture, and try panning at 1/30 to 1/60 sec to turn headlights and brake glow into streaks. Static long exposures from a stable rest (where the venue allows) can capture light trails through a corner. Expect noise and plan to clean it up in editing.
Safety and etiquette trackside
Spectator areas are designed with safety in mind. Stay in them. Never climb fences, stand on barriers or walk into restricted zones for a better angle, and follow instructions from security and corner workers (often called marshals at FIA events) without arguing. If you have a pass that gets you closer, read its conditions; restricted areas usually require a separate credential, a briefing and protective clothing.
Be a good neighbor at the fence: don’t hold your camera above other spectators’ heads for long stretches, keep your bag out of walkways and share good spots. For a deeper look at safe positioning, read How To Photograph Fast Subjects Safely and Effectively.
Getting closer: track days and club racing
If you want better access than a major race allows, look at club events. SCCA and NASA run track days, club races and autocross across the country, and the rules for spectators and photographers are often more relaxed, though waivers and safety rules still apply. Our track day photography guide explains how to approach organizers and where you can and can’t stand.
After the race: culling and editing
Cull hard. Zoom in on each frame and keep only the ones where the car’s front (headlights, badge or driver’s helmet) is sharp. Then edit for consistency: straighten the horizon, crop to strengthen the composition, recover highlights in bright paint and lift shadows under the car. Don’t oversaturate liveries; sponsors and teams care about their colors, and so do knowledgeable fans.
When you share your work, credit the event and the series, and respect any limits on commercial use in your ticket terms. Spectator tickets usually allow personal use, but selling images may be restricted.
Frequently asked questions
What is the best shutter speed for racing photos?
It depends on what you want. To freeze a car completely, use 1/1000 sec or faster. For panning with background blur and spinning wheels, start around 1/250 sec and work down to 1/125 or 1/60 as your technique improves. Slower corners allow slower speeds.
Can I bring my camera to a race?
Most US tracks allow personal cameras for spectators, but restrictions on lens length, tripods, monopods and bag size vary by venue. Check the circuit’s posted camera policy or prohibited-items list before each event, because policies change.
What lens should I bring to my first race?
A telephoto zoom such as a 70-300mm or 100-400mm, if the venue allows it, covers most spectator positions. Add a standard zoom or a small prime for the paddock and fan areas.
How do I avoid the fence in my photos?
Get the lens as close to the fence as is safe and allowed, center it in a gap, use a long focal length and a wide aperture such as f/4 or f/5.6, and shoot as perpendicular to the mesh as possible.